
Force Byte
How to use Mail Merging in Word (2)
Now I proceed to creating the data source, which contains the column headers and data used in the Form Letter (or Main Document). Actually you can create it with
different tools, like Word, Excel etc. Below I will show you how to use Word and Excel to create data source respectively.
Create Data Source using Word
It should be the convenient way to create the data source in Word, but it is not easy for you to manage the data. Anyway, let's begin by creating a new file. Then on the "Table" menu, click "Insert" followed by "Table". You will see the "Insert Table" dialog box (See Figure 1). As for our example, you need to create four columns for "UI", "Name", "Formation" and "Phone", so you have to change the "Number of Columns" under the "Table Size" into "4". You also need a header row and five data rows for the personal particulars, hence you should input "6" in the "Number of Rows".
Click the "OK" button. You will get a table with four columns and six rows to input data. First of all, you enter all column headers into the header row.
Then you can input the personal particulars of each person into each row (See Figure 2).
After that, you can simply save the document as a "doc" file, for example "db.doc".
Create Data Source using Excel
The creation is very similar to that using Word. In a new spreadsheet, you enter the column headers in the first row and the personal particulars in the next five rows (See Figure 3).
When finished, you can save the document as an "xls" file, like "db.xls".
You are now half-way through with this Mail Merging (It's quick, isn't it?). So keep reading this column next time for how to create the Main Document.
'Sharing IT as it applies to your daily life'
 Figure 1
![]() Figure 2
Figure 2
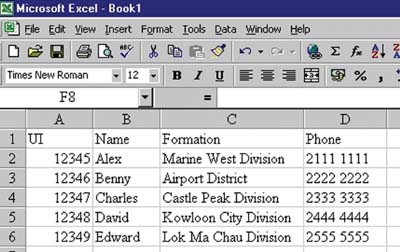 Figure 3
(Email address: 'ITB_ForceByte_Editor@police.gov.hk')