
Force Byte
How to Use Mail Merging in Word (4)
In the last three issues, we have already gone through the major steps for mail merging. This time I will continue with the rest.
Insert Merge Fields
To insert the merge fields into the main document you created last time, first move the cursor to the position where you want to insert a field, then click the "Insert Merge Field" button in the "Mail Merge" toolbar (See the circled area in Figure 1).
Word will display all the fields (See Figure 2) in the data file ("db.doc" in this case).
To produce the following main document (See Figure 3), you just need to insert each of the fields in the appropriate positions (eg. insert the field "Name" after the word "Dear").
Now you can click the "Print Preview" button (
After that you will find all the "Merge Fields" (e.g. <<Name>>, <<UI>>, <<Formation>> and <<Phone>>) are now replaced by the personal particulars of the first guest (See Figure 5). Nevertheless, you can also use the (
At this moment, you must want to print out all the letters and send them to the guests. But if you just click the "Print" button (
The whole series of "How to Use Mail Merging in Word" now comes to an end. I wish that you could master all these techniques in Word. Next time, I will begin a new series on creating statistical charts in Excel. Please don't miss it!
"Sharing IT as it applies to your daily life."
![]() Figure 1
Figure 1
 Figure 2
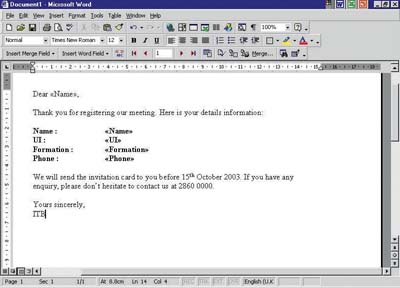 Figure 3
![]() ) to preview the main document without the merge data. However, to preview the invitation letters with the merge data, you must click the "View Merged Data" button (See the circled area in Figure 4).
) to preview the main document without the merge data. However, to preview the invitation letters with the merge data, you must click the "View Merged Data" button (See the circled area in Figure 4).![]() Figure 4
Figure 4
![]() ) and (
) and (![]() ) buttons to view one letter ahead and behind respectively.
) buttons to view one letter ahead and behind respectively. Figure 5
![]() ), you will not be able to print the invitation letters with merge data. Instead you should click the "Merge to Printer" button (See the circled area in Figure 6).
), you will not be able to print the invitation letters with merge data. Instead you should click the "Merge to Printer" button (See the circled area in Figure 6).![]() Figure 6
Figure 6
(Email address: 'ITB_ForceByte_Editor@police.gov.hk')